The Checklist Library
PERMISSIONS Security level with Admin permission to configure Checklists & Templates. Refer to Admin security settings.
PERMISSIONS Object permission Can add/edit Library Checklists and Can delete Library Checklists in CRM security settings, Service Desk security settings, and Project security settings enabled.
NAVIGATION Left Navigation Menu > Admin > Admin Categories > Automation > Checklists & Templates > Checklists.
To add a checklist to the library from the Checklist section of the New or Edit Ticket, Task, or Opportunity form, click Save to Library.
To add a checklist to the library from the Form Template Editor, click Save to Library.
On the Checklist Library page, you can add, edit, and delete checklists for opportunities, tasks, and tickets. Users with the required permissions can also add checklists to the library from the Edit Ticket, Edit Task, and Edit Opportunity pages and from the Form Template Editor pages of the same entities.
Checklist permissions are assigned per entity. For details, refer to:
How to . . .
To add a checklist to the library, do the following:
- To open the page, use the path(s) in the Security and navigation section above.
- Click New Checklist to open the New Checklist page. To edit an existing checklist, select Edit from the context menu.

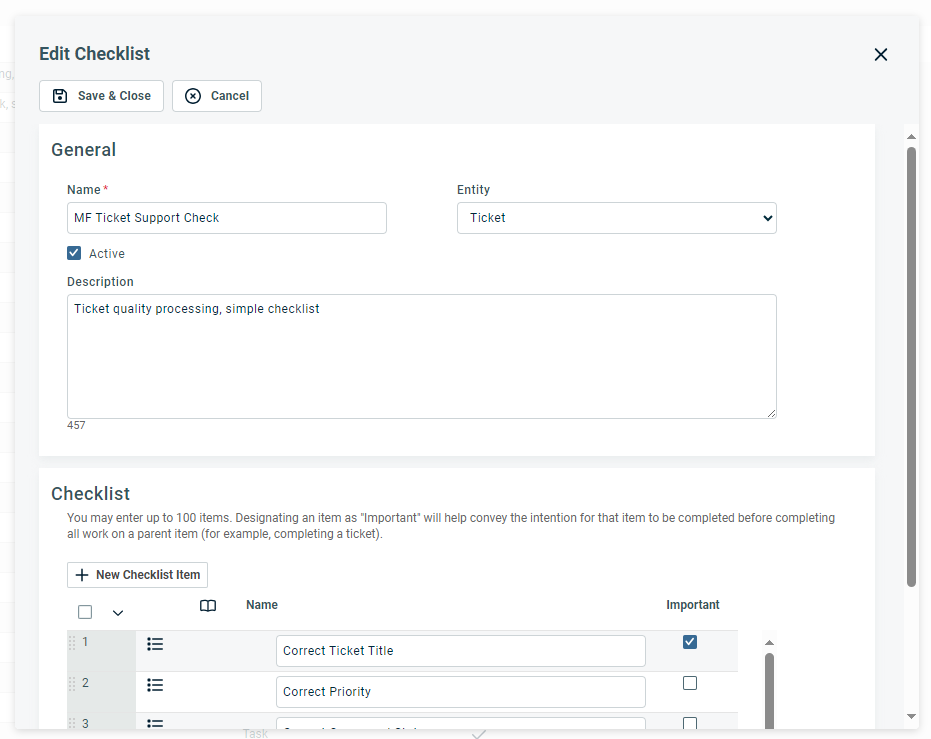
- Populate or modify the following fields:
| Field | Description |
|---|---|
| General | |
| Name | Enter the name that will appear in the Select Checklist drop-down menu when you click Add from Library on an opportunity, task, or ticket. |
| Entity | Select which entity this checklist will appear on. The menu includes only the entity or entities that your security level checklist permissions allow you to add or edit. You must have both task and ticket permissions to create or edit a checklist associated with both entities. |
| Active | Active by default. Clear this check box to make the checklist unavailable. |
| Description | Enter a description of when to use this checklist. |
|
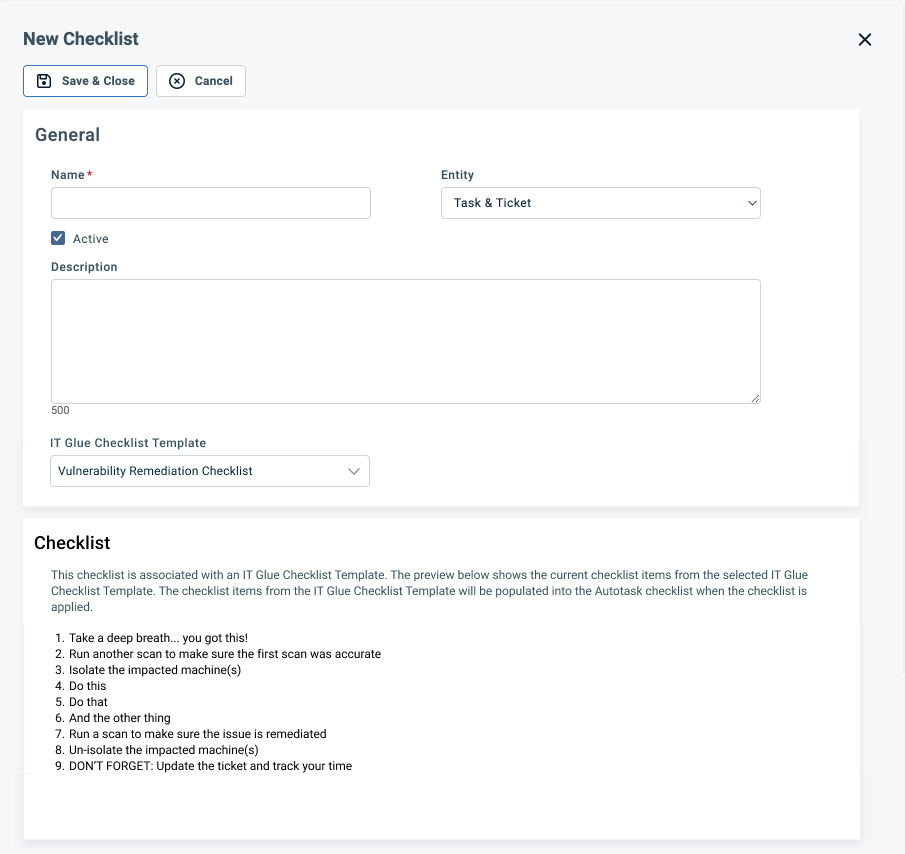
IT Glue Checklist Template |
If your organization has the IT Glue integration enabled, you can associate the new checklist with an existing IT Glue Checklist Template. Refer to Link an Autotask checklist to an IT Glue checklist template. |
| Checklist | |
| New Checklist Item | Click to add another line to the checklist table. |
| Name | In the editable Checklist table, enter the name of a checklist item into the Name field. |
| Important | If the item is important, check this box. In View mode, an exclamation mark will appear after the checklist item. |
| Context menu |
|
- Click Save & Close.
Organizations that have the IT Glue integration enabled have the option to map a library checklist to an IT Glue checklist template.
- Click the dropdown control and select a checklist template. All checklist templates are available.
- Once you select a template, a preview of the current checklist items in IT Glue will be displayed.

- The checklist items from the IT Glue Checklist Template will be populated into the Autotask checklist when the checklist is applied to a ticket.
- On the Checklist Library page, a check mark in the IT Glue Checklist column indicates that the checklist is associated with an IT Glue checklist template. Hover over the check mark to display the name of the IT Glue checklist in a tooltip.
- This option is available only for ticket checklists.
- Click Save. Checklists associated with an IT Glue checklist template cannot be edited.
NOTE You cannot manually create additional checklist items if you associate an IT Glue checklist template.
To copy a checklist, complete the following steps:
- To open the page, use the path(s) in the Security and navigation section above.
- Open the context menu
 or right-click on the line and select Copy.
 - A copy of the checklist is added to the list. The name is the same as the original, with the word (Copy) appended to the name. To modify the checklist name or make any other changes, use the context menu or right-click and select Edit.
You can control the order in which the library checklists appear on selection lists.
To modify the library checklist sort order, complete the following steps:
- To open the page, use the path(s) in the Security and navigation section above.
- Click on the numbered column for the library checklist you want to re-order and drag it to the appropriate location. When you release it, the item will appear in that location on the list.
- Library checklists will appear in this new order in lists going forward.
Library checklists are set to active by default. Inactivated checklists cannot be selected going forward.
To inactivate or activate an existing library checklist, complete the following steps:
- To open the page, use the path(s) in the Security and navigation section above.
- Open the context menu
 or right-click on the line and select Activate or Inactivate.
Library checklists can be deleted anytime. If you no longer want to use a checklist but may want to have it available again in the future, consider setting it to inactive instead.
To delete a library checklist, complete the following steps:
- To open the page, use the path(s) in the Security and navigation section above.
- Open the context menu
 or right-click on the line and select Delete.
 -
Click Yes on the confirmation message.


