Tracking Kaseya module revenue using dashboard widgets
On the dashboard, we have added the ability to group and filter pending and posted billing items by Kaseya module. Kaseya module grouping and filtering is only visible if Integrated Customer Billing is enabled.
Integrated Customer Billing allows you to bill for Kaseya modules in Autotask using contract services. Billing items are a period on a contract service.
To get any meaningful data, you must be completely set up with Integrated Customer Billing, including:
- KaseyaOne must be activated for your local organization and the user who is setting up Integrated Customer Billing. Refer to General Portal Setup.
- Your instance of Autotask must be connected to KaseyaOne. Refer to Linking modules to KaseyaOne.
IMPORTANT Sandbox environments are NOT supported.
- You must have one or several additional Kaseya or Datto modules (products) and have them connected to KaseyaOne. Refer to Adding a module launcher link.
Then you must
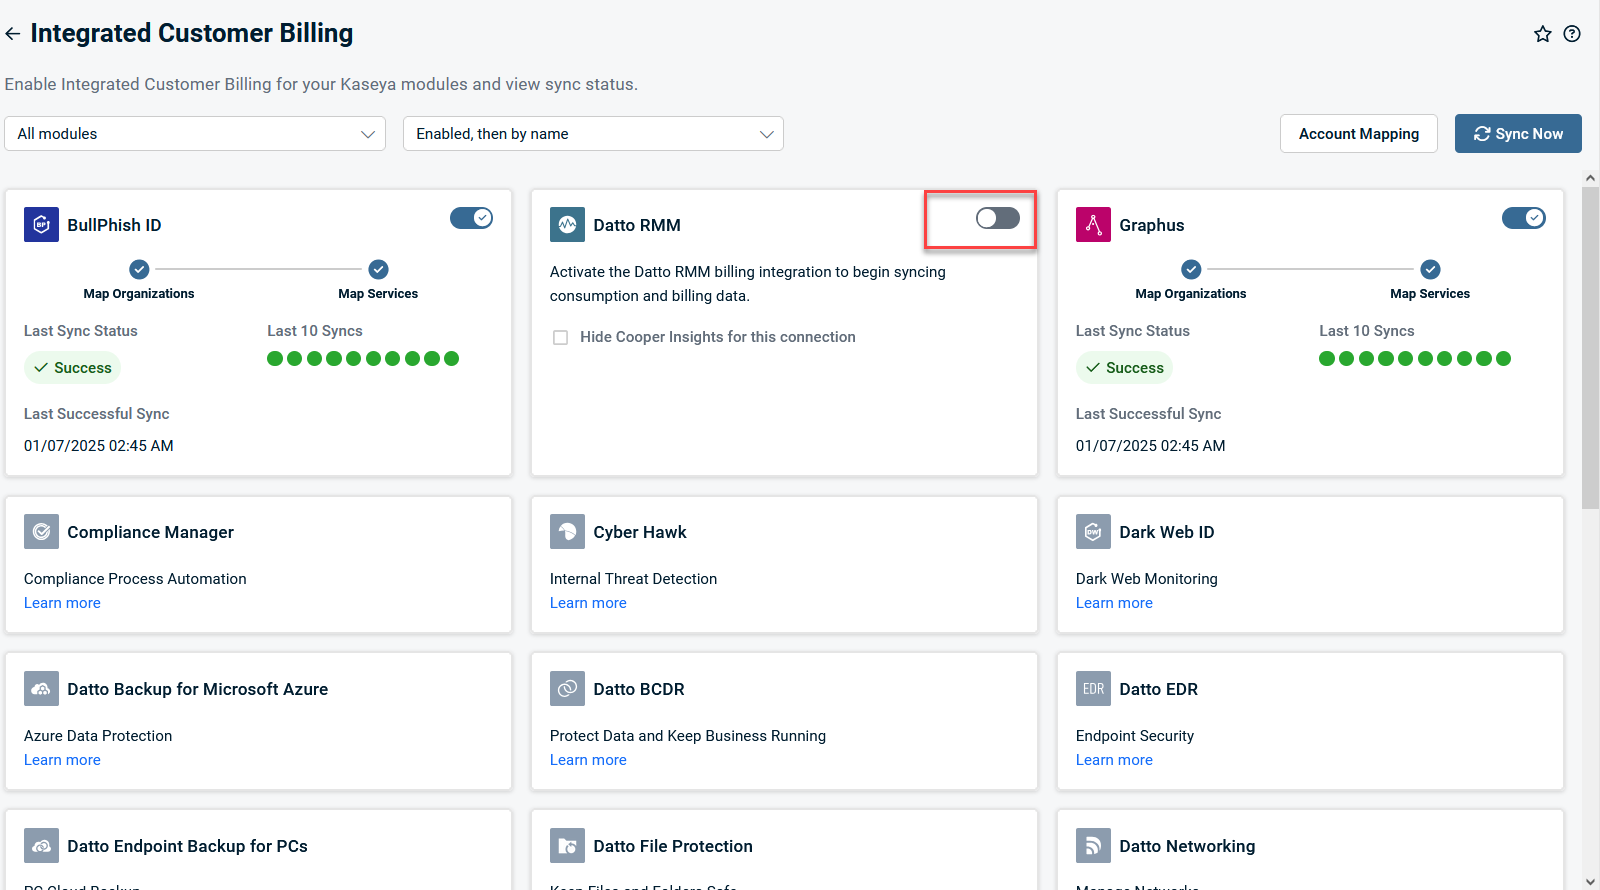
Step 1: Enable Integrated Customer Billing by module
The first step in the process is to select which Kaseya modules are part of your Integrated Customer Billing.
-
Navigate to Left Navigation Menu > Admin > Extensions & Integrations > Kaseya Integrations > Integrated Customer Billing > Enable Integrated Customer Billing by Module.
-
Select the appropriate tile and move the slider to the Enabled position.
EXAMPLE In the example followed in the rest of this article, an RMM customer is integrating their RMM billing flow with Autotask. This customer will toggle the slider to enable the Datto RMM module as shown below.
-
Click Sync Now.
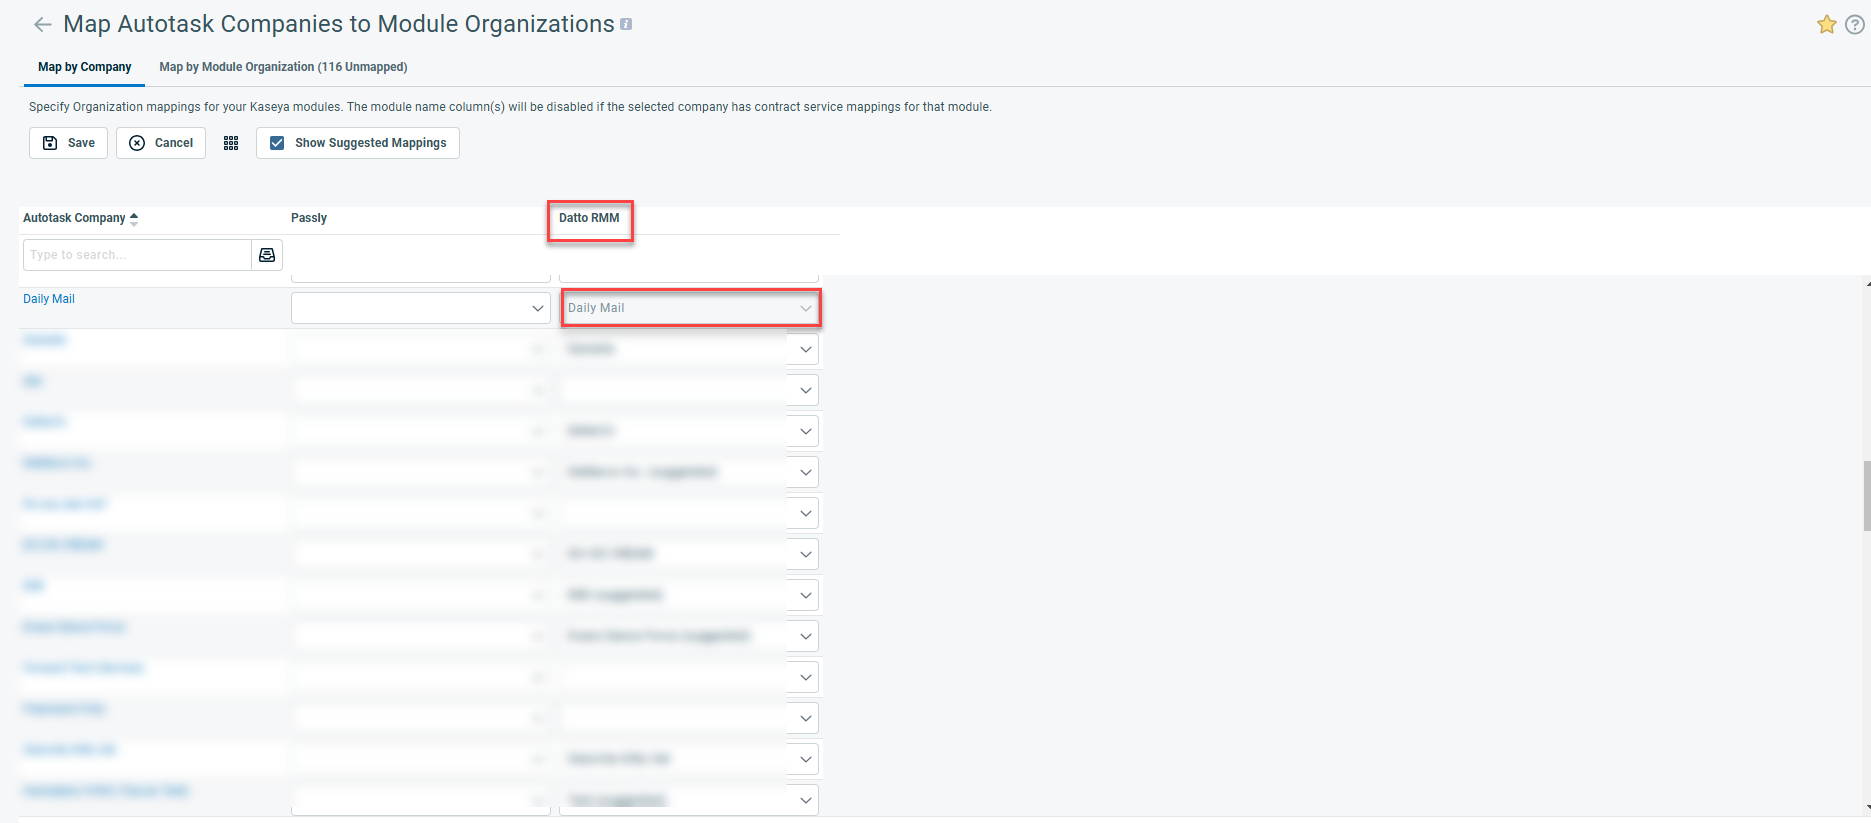
Step 2: Map Autotask organizations to organizations in other modules
The name of your customer organizations may differ a bit from one module to the next. To make sure that every customer receives the correct bill, you need to map the Autotask organization that will receive the invoice to the correct organizations in all other modules.
Take the following steps to map the Autotask organization to your Kaseya module organizations.
-
Navigate to Left Navigation Menu > Admin > Extensions & Integrations > Kaseya Integrations > Integrated Customer Billing > Kaseya Module Organization Mapping.
-
In the Autotask Organization column, type an organization name or open the selector to locate an Autotask organization.
-
Click the drop-down menu for the Kaseya module you'd like to map and select the organization.
-
Continue with other rows and columns as needed.
EXAMPLE For our RMM example customer, the Autotask and RMM organizations have the same name. Daily Mail has been selected for the Autotask organization and Daily Mail has been selected for the RMM organization.
-
To save your mappings, click Save.
- If you click Save while the Show Suggested Mappings check box is selected, you will have the option to save the suggested mappings on the page.
- If the Show Suggested Mappings check box is cleared, the suggested mappings will not be saved.
For more information, refer to Mapping Autotask organizations to module organizations and Mapping module organizations on the Organization page.
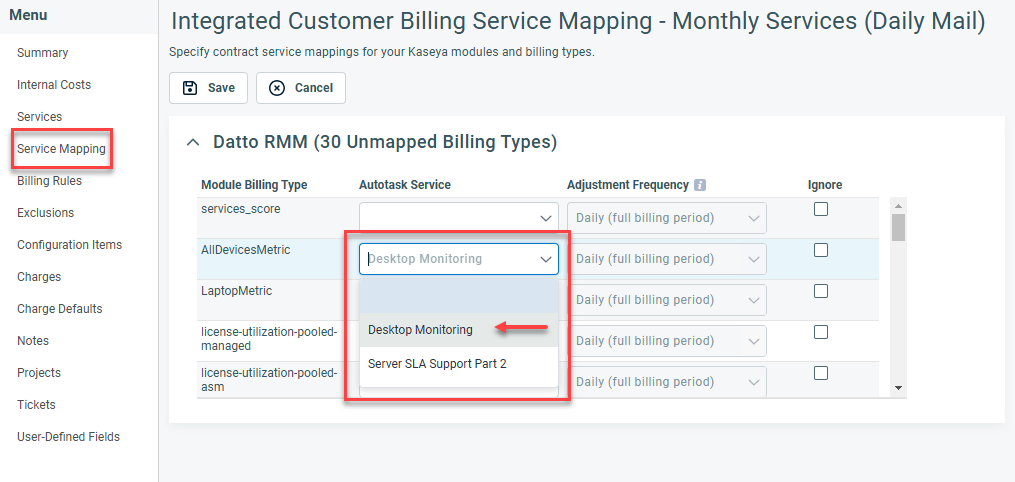
Step 3: Map KaseyaOne module billing types to Autotask services in a recurring service contract
When the Kaseya modules are enabled for Integrated Customer Billing and the organization names in those modules are mapped to Autotask organizations, you are now ready to set up and map the services in the appropriate recurring services contracts.
-
Navigate to Left Navigation Menu > Contracts > Search > Contracts > open a contract > Menu > Service Mapping.
NOTE The Service Mapping tab will only appear if Integrated Customer Billing is enabled and the organization is mapped to a KaseyaOne module.
-
In the Autotask Service column dropdown, select a service for the Module Billing Type. Refer to Integrated Customer Billing Types for more information.
NOTE Before you can map billing types to Autotask services, you must have services on the contract.
-
Continue with other rows as needed. Check Ignore if you do not wish to include a billing type for billing.
EXAMPLE The Datto RMM "AllDevicesMetric" Billing Type is mapped to the Autotask Service, "Desktop Monitoring", as shown in the screenshot below.
-
Click Save.
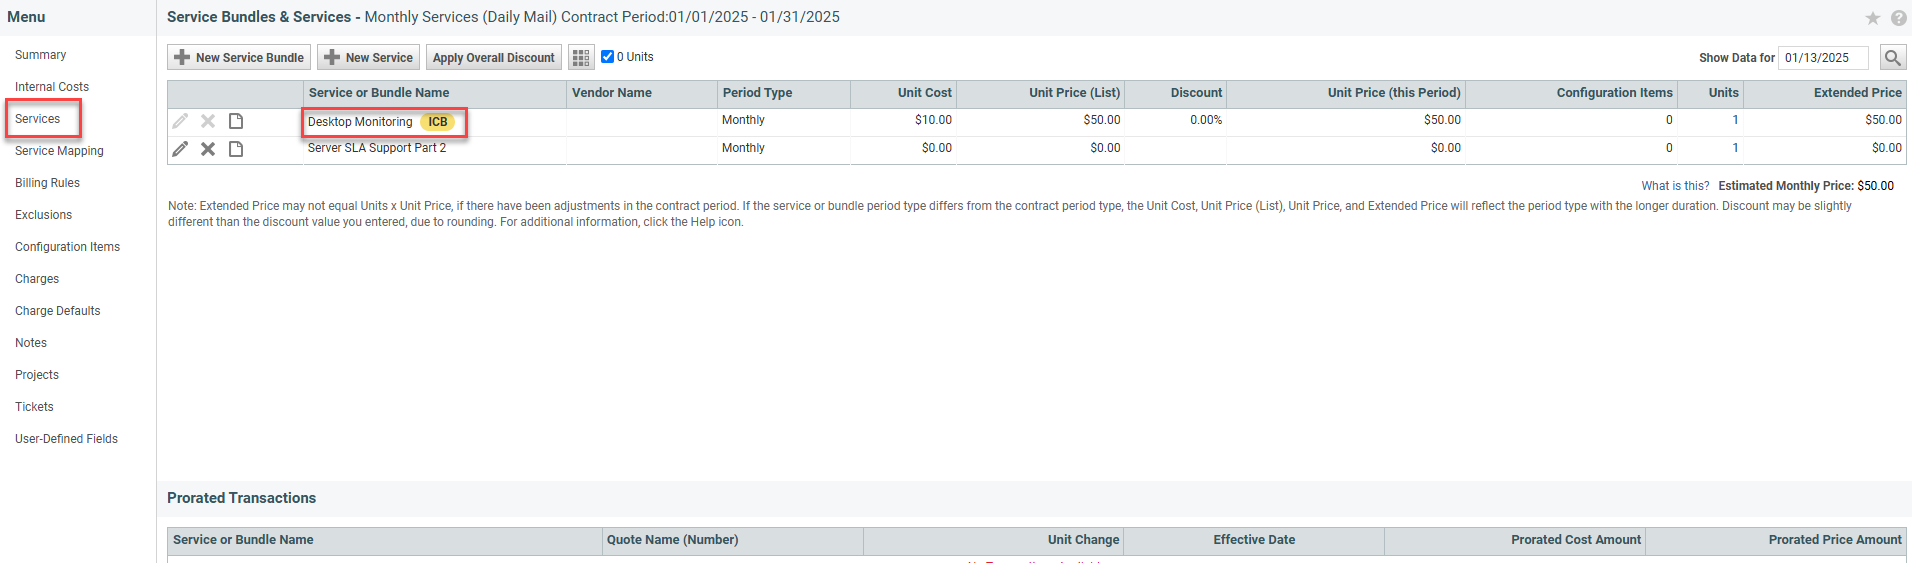
NOTE The Autotask services that have been connected to Integrated Customer Billing will have the  icon present on the Services tab of the contract.
IMPORTANT If a prorated billing period is created for a service and then mapped to Integrated Customer Billing Types, it will cause additional units to appear and any prorated unit counts will not be removed until the next billing period.
Refer to Service Mapping for more information.
Then, you must allow the overnight sync process to run at least once successfully, so you have some data to report on.
Finally, you must create one or more widgets in the Pending Billing Items and/or the Posted Billing Items entity, and group and possibly filter the data by the new Kaseya Module selection.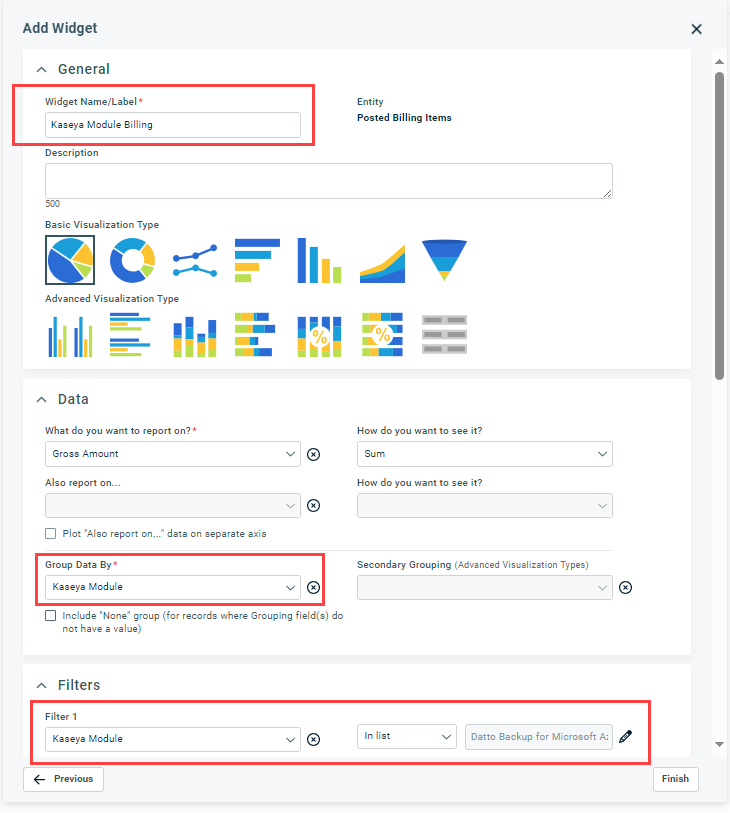
Add the widgets to a dashboard tab, maybe a new "ICB" tab: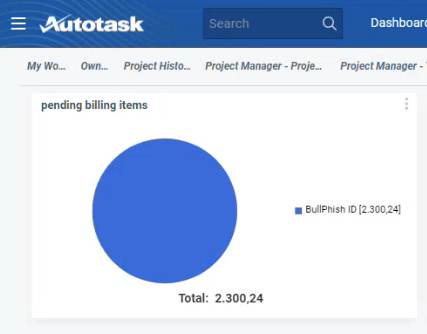
You can drill into the widget and manage the data in the normal manner.


